First pick an image or topic, I am obsessed with the pandanas, therefore many of my images begin with a photo of pandanas and I build from there.
I am going to show you how to get from this photo to a completed image.
Open a photo in Photoshop.
Make sure you have the layers window open.

Before you start layering the photo, you can choose to adjust the image size and resolution.
You can also choose to make a few adjustments for example the colour balance.
Click on the only layer in the layers pallet and name the layer, I have named it original.
The layer should now appear with the name original.
Duplicate the layer. The easiest way is to drag the layer down to the create new layer icon in the layers pallet.
I now would like to remove part of the top layer using the extraction tool.
Go Filter, Extract.
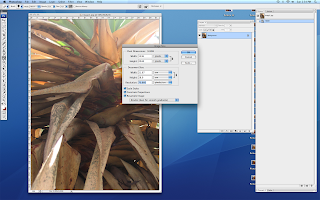
The next image shows the extraction window.
Using the pen tool in the left hand corner, draw over the area you wish to extract.
Using the colour fill tool also in the left had corner, colour fill the rest of the image.
Click OK
Your image now has areas that have been extracted.
Click the eye icon off on the bottom 'original' layer so you can see the areas that have been extracted.
Duplicate the top layer.
Add a blend to the new top layer, you will find the blending tools on the layers pallet.
I have added multiply.
Click back on the eye icon on the bottom layer to reveal the original image again.
Import a new image.
I have opened an image of sand to create texture.
Change the order of the layers by clicking and holding onto the layer you would like to move and drag it to where you would like it to be.
I have ragged the sand layer to be above the original layer.
Add another blend, this time I am adding, soft light, to the sand layer.
Create a new layer by clicking on the create new layer icon on the layers pallet.
Pick a colour and using the colour fill tool from the tools pallet, fill the layer.
Drag the new colour fill layer to the bottom.
Add a blending tool to the original layer. I have added a hard light blend.
I now click back on the the first extracted layer and adjust the levels.
Create another new layer.
Click on the brushes tool on the tools pallet and select the type of brush, the size and the opacity.
Drag this layer to the top and start drawing rough marks.
Select the eraser tool from the tools pallet, again select the type of erase, size and opacity.
Work back through the rough mark that you made t create texture and movement.
Create another new layer and a new colour.
Click on the brushes tool and again continue to make rough marks.
Again use the eraser to work back through your marks. You now have a completed image.
The next four images give you some examples of how your image can change just by clicking on and off the different eye icons in the layers pallet.
When you have decided on the final image, flatten the image and save.


